post by Nick Haunstein
This post will focus on a feature that is technically present in BizTalk Server 2010, but was not installed by default. This feature was a subtle enhancement to the BizTalk WCF Service Publishing Wizard – namely the ability to publish a Windows Azure Service Bus Relay Endpoint without leaving the wizard (and also without using one of the new adapters that has Relay in its title).
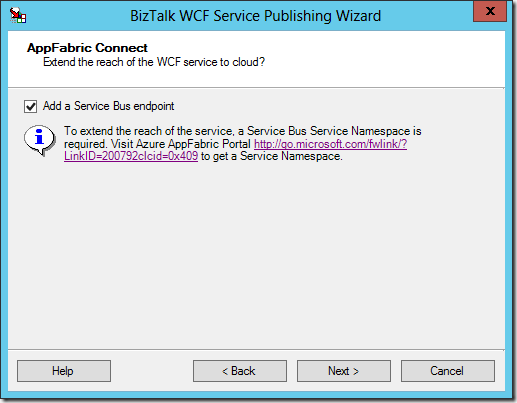
Even if you didn’t know that this feature existed, you will find it the first time that you attempt to publish any BizTalk artifact (schema/orchestration) as a WCF service in BizTalk Server 2013. It takes the form of the following screen within the BizTalk WCF Service Publishing Wizard, which appears immediately after choosing to publish a service (rather than simply a metadata description):
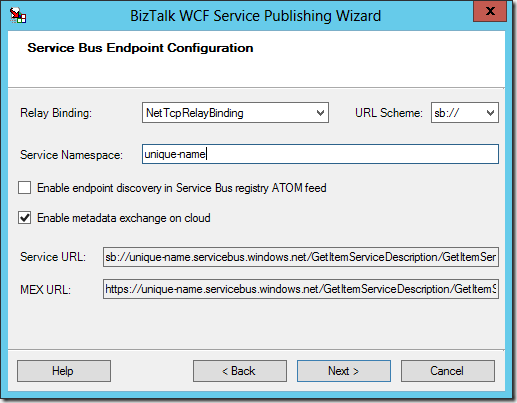
If you check this box and proceed through the wizard (regardless of adapter selected on the first screen), you will see the following screen at the end of the typical wizard:
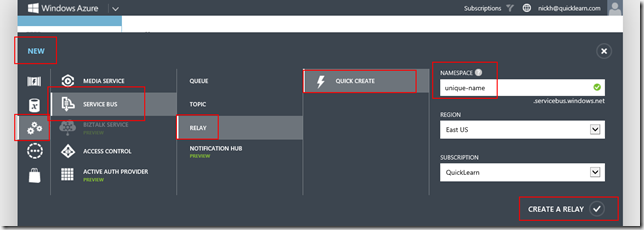
The wizard assumes that you have already gone to the Windows Azure Management Portal and created a Service Bus namespace (effectively reserving yourself a sub-domain of servicebus.windows.net, and setting up an access control namespace for claims resolution and authorization purposes). If you’ve never done that before, it can be done through the New menu as shown below:
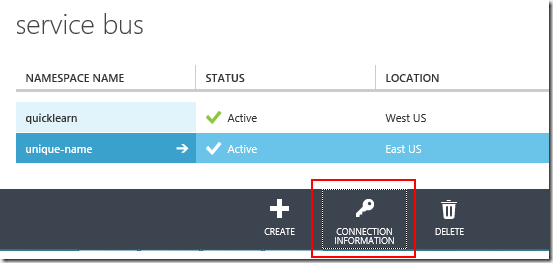
The next page of the wizard will require information necessary for BizTalk to authenticate with Windows Azure and prove that it is indeed the destination endpoint for the relay. This information is also obtainable only from the Windows Azure Management Portal. In order to access this information, you will need to click on your newly created namespace in the list of Service Bus namespaces, and then click theConnection Information button at the bottom of the page:
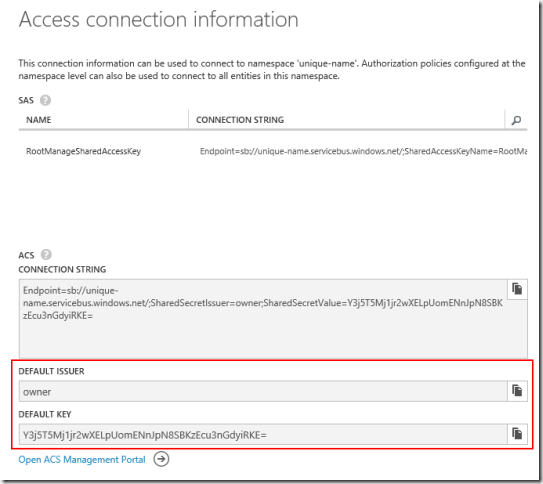
This will bring up the following listing, of which you really only need to worry about theDefault Issuer (Issuer Name in the wizard), and Default Key (Issuer Key in the wizard):
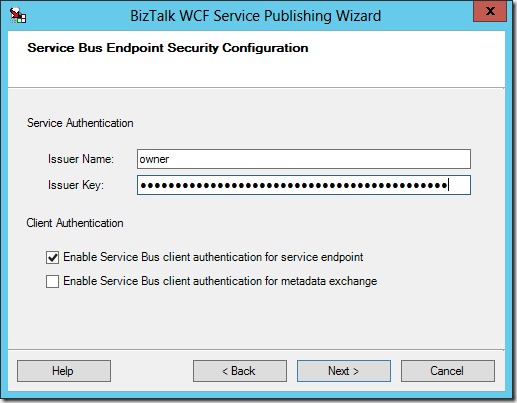
Once you gather this information, you’re ready to have a copy/paste party and fill out the last page of the wizard (unless you really want to live life in hard mode, don’t enable client authentication for metadata exchange – if you feel the need to do that, you may as well pass around the raw WSDL to whomever needs it and just forget about a MEX endpoint):
Once you’re up to this point, you can sprint to the finish by clicking Next, Create(after reviewing the wonderful WSDL and making sure it’s something that you can be proud of), and then finally Finish.
TACKLING COMMON ISSUES
Outside of the typical issues one might encounter hosting a WCF Service in a BizTalk Isolated Host (e.g., App Pool Identity needs permissions to Message Box database, correct .NET Framework version needs to be selected for App Pool, Receive Location must be started), you may also encounter a new one:
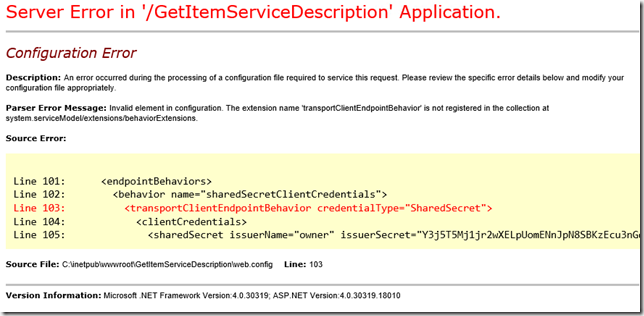
Again, for those using Google-fu in attempt to resolve an error, the error message reads:
Invalid element in configuration. The extension name ‘transportClientEndpointBehavior’ is not registered in the collection at system.serviceModel/extensions/behaviorExtensions
And it’s highlighting the portion of the configuration file that includes the key for Service Bus authentication.
Before getting right to the resolution, let’s recap what we’re looking at. Going through the wizard, I had selected to host a WCF-WSHttp endpoint internally in a BizTalk Isolated Host (i.e., running in an IIS App Pool rather than a BizTalk Host Instance process). I then indicated that I wanted to also expose the service through a NetTcp relay endpoint hosted externally (on Windows Azure).
My local IIS instance has been provided all the configuration information that it needs to coordinate with Windows Azure and make the relay live, but it currently doesn’t know what to do with it – which is why I have the error, and why my relay won’t be alive yet.
In reality, this all could have been avoided by reading. Specifically reading the last page of the BizTalk WCF Service Publishing Wizard, which should tell you that you need to install the AppFabric 1.0 SDK before any of the relays will work. Again, this is functionality that was technically available in the previous generation, hence the older SDK version number.
HOW TO KNOW THAT IT’S WORKING
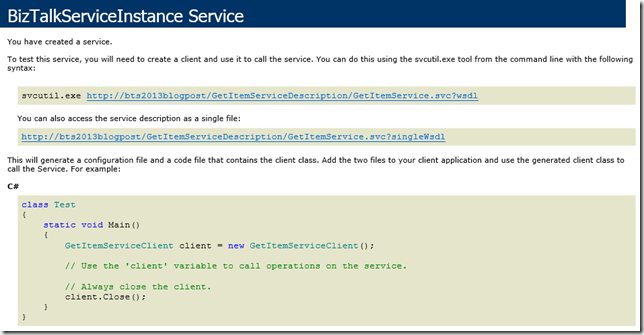
If you have made it this far successfully, hitting the local service endpoint should give you a page that looks something like this:
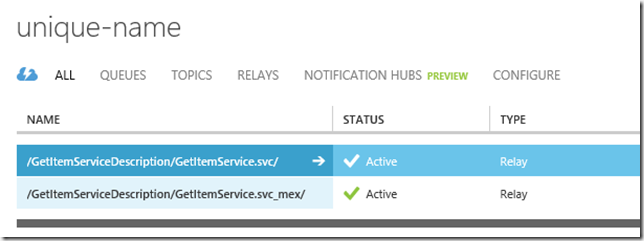
If you go to the Windows Azure Management Portal and dig into the namespace you created, you should see something like this:
IT’S NOT REAL UNTIL I CAN CONSUME IT
If you’re anything like me, this is an unsatisfactory ending point – the service doesn’t really exist until I can consume it from some client. To make it as fair as possible, I am hosting the service inside a fairly locked down Windows Azure Virtual Machine, and I will be consuming it from my laptop connected ultimately via a microwave connection somewhere in the shadow of Mt. Pilchuk.
To consume this beast, we need to know our namespace (e.g., unique-name.servicebus.windows.net), and the mex endpoint exposed via relay (seen in the screenshot above). From there I can construct the address I would use in the Add Service Reference dialog in Visual Studio. In this case, that URL will be:https://unique-name.servicebus.windows.net/GetItemServiceDescription/GetItemService.svc_mex
Upon consuming the service, you may notice that the WSDL importer chokes hard on the WSDL it’s finding. It tries to build up a custom binding to make the call, and it’s finding that it doesn’t really know anything about some of the binding elements required:
Again for those searching for this specific error, the message reads:
WsdlImporter encountered unrecognized policy assertions in ServiceDescription ‘YOUR NAMESPACE HERE’
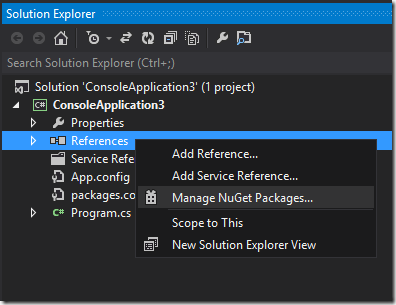
In reality, we don’t need to build a custom binding to make this all happen. Instead, we can use the netTcpRelayBinding to make the connection. An easy way to make that happen is to install the Windows Azure Service Bus NuGet package to our project. We can start out by using the Manage NuGet Packages context menu item in Solution Explorer:
Then search for the Windows Azure Service Bus package, and click the Installbutton:
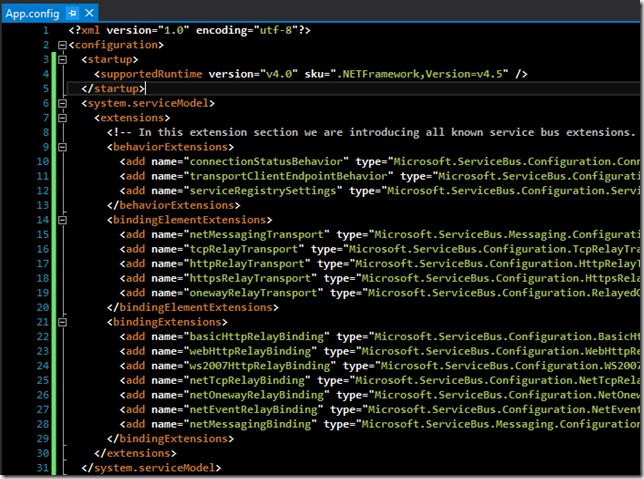
This should update the App.config file of your application to include the following WCF extensions:
From there, you will want to update your endpoint to reference thenetTcpRelayBinding (instead of the custom binding that the WSDL importer failed to generate properly):
1
2
3
4
5
| <client> <endpoint address="sb://YOUR-NAMESPACE.servicebus.windows.net/YOUR-SERVICE-LOCATION/YOUR-SERVICE-HERE.svc" behaviorConfiguration="sharedSecretClientCredentials" binding="netTcpRelayBinding" contract="RelayedItemService.ItemService" name="RelayEndpoint" /></client> |
You will also notice above that we have assigned a behaviorConfiguration — one that currently does not yet exist. So next, we will need to add an endpoint behavior (inside the system.serviceModel section of the App.config) to perform client authentication (if you don’t want to re-use the same credentials as before, make that visit over to the ACS Management Portal that the Connection Information page is begging you to do):
1
2
3
4
5
6
7
8
9
10
11
| <behaviors> <endpointBehaviors> <behavior name="sharedSecretClientCredentials"> <transportClientEndpointBehavior> <tokenProvider> <sharedSecret issuerName="owner" issuerSecret="YOUR SHARED SECRET VALUE HERE" /> </tokenProvider> </transportClientEndpointBehavior> </behavior> </endpointBehaviors></behaviors> |
This is something that has changed more recently. In fact, I couldn’t find a single place documenting what this behavior should actually look like right now. Hopefully that will change.
INVOKING THE SERVICE
Once we get through all the configuration craziness, we’re ready to make quick work of calling the service with two lines of code (backed by a billion lines of configuration):
1
2
| YourServiceDotNetNamespace.YourServiceClient client = new YourServiceDotNetNamespace.YourServiceClient("RelayEndpoint");client.GetItem(new YourServiceRequest() { Id = "test" }); |
That’s all it takes.
